Sunday, October 31, 2010

Not so Itsy-bitsy Spider Headband—Tutorial

What you will need:
Hot Glue Gun
Scissors
Sheet of black felt (cheap stiff kind)
2” Black Pom Pom
2-Googlie eyes
Headband
4-black pipe cleaners

1. Cut out a 1.5” circle out of the felt.
2. Glue the circle to the underside of the headband placed somewhere along the top. It doesn’t have to be centered.
3. Take a pipe cleaner and glue the center of the pipe cleaner on top of the felt circle running horizontally with the headband. Two pipe cleaners will go on each side of the headband. Refer to fig. 3 for placement.
4. Hot glue the googlie eyes onto the pom pom.

5. Glue the pom pom to the top of the felt, sandwiching the headband and pipe cleaners between the two.
6.Bend each pipe cleaner leg roughly in half facing down. Then take a small tip on the end of each pipe cleaner leg and bend it up, see fig. 6.

Written by Design by Night

Random Baltimore Photo

[blackcat]

Happy Halloween!

Image by Elwyn. Click here for more details.

Saturday, October 30, 2010

October is Breast Cancer Awareness Month


I don't think there is a person on this planet who's lives haven't been effected by breast cancer. Be it their own battle, a loved one or an acquaintance. There are many ways to pay tribute to and support those wonderful woman in your lives who have been effected by this disease – a walk to raise funds for research, a purchase where the proceeds go to research, donating hair to be used for wigs or even simply offer your emotional support.

Take a moment this month to think about how you can help and leave comments with suggestions on how others can help.

Friday, October 29, 2010

What I'm Working On

Sometimes I have trouble focusing when it comes to making art. The ideas tend to come pretty fast and furious and can be all over the map. If you've ever looked through my Etsy shop you'll probably understand what I mean. In an effort to focus my creative energies, I've spent the last couple of weeks adding new items to 3 of my ongoing series.

I've added some pretty sparkling metallics to my "Out on A Limb" Series


I've added a Hammer to my "Tools of the Trade" series (suggested & inspired by Juliet, the gifted plate-breaker)

Finally I made some sweet winter hats to add to my "Lovin Knit" series.

Thursday, October 28, 2010

Tutorial - Glowing Halloween Ghosts


Here's a quick way to add a little spooky glow to your Halloween. These little polymer clay ghosts are perfect for decorating a tabletop, hanging on a tree or using as a finger puppet. The directions are super simple and kids over 4 should be able to handle this craft with no problems.

Tools & Materials:

* glow-in-the-dark polymer clay
* black polymer clay
* a disposable foil baking pan
* Aluminum foil

Optional items:
* Fishing line
* needle

Directions:

1. Make a ball of the glow-in-the-dark clay by rolling the clay between your palms . The size you use will depend on how big you want your ghosts. I used about a 1/4 of a block to make my 3 inch tall ghosts, but tiny ghosts are just as scary.


2. Roll out 2 small black balls for eyes and 1 slightly larger ball for the mouth.

3. Carefully flatten the ball with the palm of your hand. You can also use a roller or a pasta machine to flatten the clay into a 1/4 inch thick flat circle.

4. Put your finger in the middle of the circle and pull the clay down around your finger to make the ghost shape.

5. Flatten the eye circles between your fingers and gently push them onto your ghost. The clay will stick very easily. Do the same with the mouth.

5. Take your finger out of the ghost and see if he is sturdy enough to stand on his own. If you made him too thin, you may need to put him over a ball of foil to keep him upright during the baking. He'll be able to stand on his own just fine after baking.

6. If you'd like to have a hanging ghost, place a small hole in the top of the ghost with a needle before baking.

7. Place your ghost in the aluminum baking dish. **Do not use a dish that you use for food.** Cover the entire dish with aluminum foil taking care to seal the it to avoid fumes escaping into your oven. Bake for 20 minutes at 250 degrees.

8. Take your ghost out of the oven and allow it to cool for about 20 minutes.

Put the ghost under a light for a few minutes and then watch them glow. If you want the hang the ghosts, tie a knot in one end of fishing line and thread the other end through the hole in the top of your ghost. Make a loop for hanging. Fishing line works great because it's strong and virtually invisible with the lights out. Hang them from a tree or string several together to make a garland and enjoy the spooky glow.

Wednesday, October 27, 2010

Favorite Etsy Shop - Janet Hill Studio


I just love Janet Hill Studio's oil paintings and prints. Their soft colors, retro feel and strong feminine themes really appeal to the 1950's housewife deep inside of me. You know the one that wears dresses and heels everyday while effortlessly baking cakes and other goodies in her perfectly sweet retro kitchen. She's really able to create interiors that I just want to walk into and never leave (and not just because of all the cakes and other sweets). Along with her interiors, Janet also paints lovely portraits of women and shoes (Yes, ladies shoes). What are you waiting for? Visit Janet Hill Studios for a sweet feminine escape.

Tuesday, October 26, 2010

Baltimore with Babes - A Spooktacular Family Concert


Get ready for thrills and chills as the Baltimore Symphony Orchestra premiere's Lemony Snickets' "The Composer is Dead" October 30th at 11:00 AM at the Joseph Myerhoff Symphony Hall. If you have elementary school kids, they are sure to know about Lemony Snicket's "A Series of Unfortunate Events" books or even the movie of the same name.

Will your kids figure out how the composer met his unfortunate demise? The show is for children 5 and up and their families. Kids who show up in their Halloween costume will have a chance to win a special prize. Come early as the BSO Family Fun Zone will open at 10AM in the main lobby.

Tickets start at $12. Visit BSOmusic.org for ticket info.

Monday, October 25, 2010

What to do with all them Apples!


There is nothing as wonderful as the smell of an apple pie, especially
in the mist of this great fall apple season. My best pies come from
using a variety of apples. Go to the farmers market and grab about 6
different apples. I use this very basic recipe that I found in my Look
and Cook
cookbook, a children’s cookbook from Tina Davis.

This cookbook contains recipes for old-fashioned dishes and nostalgic
illustrations from the 1920’s through the 1950s that may appeal more
to nostalgic adults than to children.
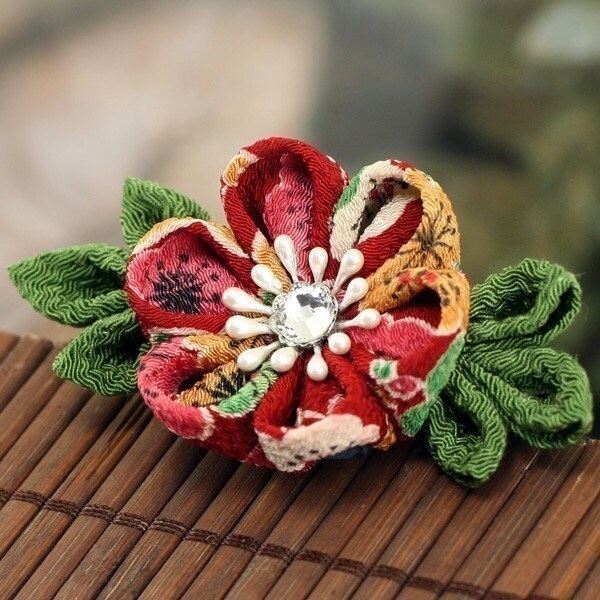
This is a pic of my first try to this recipe. I even used the pie
crush recipe to make the pie crush!

4 cups of (4-5 med. apples, I’ve pushed it to 5 cups) apples
peeled, cored and sliced
2 teaspoons fresh lemon juice
¼ cup all-purpose flour
½ cup sugar
½ teaspoon ground cinnamon
3 tablespoons butter, cut into pieces
1 recipe piecrust
1 egg yolk, lightly beaten and mixed with 1 teaspoon of water

Optional; I’ve replaced an apple for a pear as well as added
raspberries into the apple mixture to bump it up a notch!
Preheat oven to 425degrees. In a large bowl, combine apples, lemon
juice, flour, sugar and cinnamon, set aside.

Roll out two piecrusts. Place the bottom crust on a 9-inch pie plate,
gently pressing the dough into the bottom of the pan. Pour the apple
mixture into the bottom crust and dot with butter. Cover the apples
with top crust, crimping the top and bottom crust together all around
and trimming off the excess dough. With a small knife, cut vents in
the top crust to allow stream to escape while the pie bakes.

Brush the top crust and the crimped edge with the egg yolk mixture.
This will help the top crust brown nicely. Bake for about 45 minutes,
until the top is golden brown all over. Let the pie cool on a wire
rack for at lease 10 minutes before slicing. Serves 6 to 8.
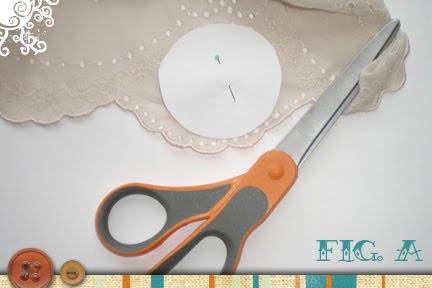
Saturday, October 23, 2010

Tutorial: Mask-making With Paper Pulp

Mask-making With Paper Pulp


Materials: ¼ lb. paper pulp (like Celluclay)
1 2/3 cup water
petroleum jelly

Equipment: Plastic face form
wax paper or heavy duty aluminum foil
1qt. freezer bag
paper towels
dust mask

1)Spread wax paper or foil onto your work-surface and place the face form on top.

2) Place the dry paper pulp into a freezer bag, and slowly pour 1 1/3 cup of water into the bag.


(Always wear a dust mask when handling dry paper pulp, the little particles love
to float everywhere, especially when you're adding water to it) Seal the bag,
and knead the water into the pulp until there are no dry spots or lumps and it has a clay-like consistency. Add water as needed.

3) Fold a paper towel and use it to spread petroleum jelly onto the face form, in a relatively thin, even layer. Take a some paper pulp and kneed and roll it into a ball with your hands ( it's going to be very messy, so wear gloves if want to), this will further soften the paper clay.


4) Using your fingers, spread the paper pulp onto the face form evenly. The layer should be no more than about ¼ in. thick and no less than 3/16 in. thick for stability and shortened drying time. (Any thicker than ¼ in. and you run the risk of mold growth, because of the increased drying time.) Use wet fingers to smooth the pulp down. Allow the mask to dry for 24 hours. Remove the mask from the face form to allow the back of the mask to dry.

5) After this you can do just about anything you want to the mask. If you want the mask to be smoother, either apply spackle to the front and back of the mask, and sand with 80 grit sand paper, finishing with 120 grit; or just sand the mask itself. You can also apply a gesso ground before painting. The fastest and cheapest way to seal a mask is to use a trick polymer clay artists use: Future Floor acrylic finish. This will make your mask sweat- and water-proof. To tint the clay itself, add powdered pigment to the dry pulp, mixing them well before adding water.

Post written by MoonRavenArts

Thursday, October 21, 2010

Baltimore Life: Barcstoberfest at Patterson Park


This Saturday October 23rd at 11am for the 6th annual BARCStoberfest!

Bring your family and friends (furry or not) out for a walk to benefit pets less fortunate. Last min registration is at 11:00, Strut Your Mutt lines up at 12:00.

And if you like to oogle the silliness of pet costume contests, you are in luck. There will also be food, live music, local arts and crafts vendors, adoptable cats and dogs from BARCS and other rescue groups.


We have to make the most of the these beautiful Autumn days! Come over to southeast Baltimore, enjoy Patterson Park and raise some money for a good cause. We plan on going to the event for our first time this year, I think my 5 year old is going to love this!

Wednesday, October 20, 2010

What I'm working on-Jillpopowichdesigns


Every year the Gem Cutters Guild here in Baltimore hosts the Atlantic Coast Gem, Mineral & Jewelry Show. It is a show that I've gone to for the past couple of years and get more excited every year waiting for the weekend this show takes place. This show is geared towards true rock hounds, collectors and jewelry designers. This is my one opportunity every year to hunt for the most amazing hand cut stones. Lapidary work (the art of cutting rocks into stones) is truly a craft all it's own. It takes a good eye to find the 'sweet spot' in a slab of stone and polish it into an amazingly smooth jewelry quality stone.


This finished necklace is one of my finds from last year which I still have yet to bring myself to part with.


I found an amazing variety of colors and shapes this year, I can't wait to try some new things out and give these stones the attention they deserve. What I find so fascinating about these stones is that the colors and patterns are all natural, this is how the earth made them. Nothing has been enhanced. Wow.

Monday, October 18, 2010

Favorite Etsy Shop - Mudpie2

Sometimes I truly think that I break plates for a living because I am just a suppressed, tortured ceramic artist. I took a handful of ceramics classes in college, and I really enjoyed it, but man, did I stink at it. Mudpie2 makes just the kind of ceramics that I wish I could make. They are super clean, consistent, colorful and, of course, beautiful. I will someday soon be treating myself to one of her mugs.

Saturday, October 16, 2010

School 33 Art Center’s 22nd annual Open Studio Tour

More than 100 local artists open their studios to the public during School 33 Art Center’s 22nd annual Open Studio Tour on Saturday, October 23 and Sunday, October 24 from 10am-6pm.

The city-wide event features the work and studios of professional and emerging artists from Baltimore. Visitors can interact with artists, view the process of making art and purchase work directly from the artists including paintings, sculptures, photographs, mixed media and more. Participating studios are located throughout Baltimore City.

Friday, October 15, 2010

Baltimore Print Studios - GRAND OPENING PARTY!

Come and celebrate the Grand Opening of Baltimore Print Studios on Sunday October 17th, from 3-7 PM. Opening their doors to the public for the first time, they will be offering hands-on printmaking demos in both letterpress and screenprinting, and handing out information on workshops and studio access. Light refreshments will be provided. The event is free and open to the public. RSVP Here.

Time: Sunday, October 17 · 3:00pm - 7:00pm

Location: Baltimore Print Studios, 18 W. North Ave Baltimore, MD (next to the Windup Space between Maryland and Charles streets)

Wednesday, October 13, 2010

Baltimore With Babes- Pumpkin Fest

It won't be long before we're all house-bound. And I think that beautiful Fall weekends are nature's way of saying "Get out while you can!" What better reason to spend the day outside than this...


Irvine Nature Center will host its 26th annual PumpkinFest, a harvest festival, on Saturday October, 16th and Sunday, October 17th. The autumnal celebration features pumpkin picking, pony rides, live music and other outdoor fun.

The rain-or-shine event will take place from 11 a.m. to 4 p.m. on Saturday, and from noon to 4 p.m. on Sunday. Each child costs $10, which includes a free pumpkin. Adults and children younger than 3 are admitted free. Parking is also free.

Harvest festival attendees will revel in a mixture of activities, including scarecrow-making, hay rides, face painting, animal encounters, puppet shows and guided nature walks. MusicHealsUs will include visitors in a drum circle, and Fiddlesticks and the Gerry Gessie Duo will perform acoustic folk music. There will also be nature-themed art projects for children. All activities are free with paid admission.

"PumpkinFest is great opportunity for families to explore the outdoors during one of the most beautiful seasons of the calendar year - fall," said Irvine's Executive Director Peggy F. O'Neill. She added that the event is fun for all ages, and makes a great weekend outing for families large and small.

Irvine Nature Center is located on 116 acres of woodlands, wetlands and meadows in the breathtaking Caves Valley area. Open year round, Irvine offers opportunities for visitors to explore nature, including special events like PumpkinFest, daily classes of nature-based curriculum for 3 to 5 year olds, public programs, summer camps, field trips, green weddings and an interactive natural history museum. For more information, visit www.ExploreNature.org.

Monday, October 11, 2010

Favorite Etsy Shop: Petal Mix

I came across this Etsy shop a few days ago when a friend of mine posted a photo of her new flower headband, and fell in love with their work.


Petal Mix makes gorgeous hair accessories and brooch pins with a modern twist on the Japanese art of tsumami kanzashi. Each petal is hand cut and folded from beautiful silks, imported Japanese textiles, and other high quality fabrics with exquisite details.


She can change the hardware (brooch to clip, etc) and add an alligator clip with a toothed clip for extra grip upon request.

Merry Mart deadline is tonight!

Applications for Merry Mart at the Creative Alliance close tonight at midnight! Apply now!

Saturday, October 9, 2010

Recycled Ruffled Headband Tuturial


If you pick up any fashion magazine or browse the racks of you favorite store, you will notice that ruffles are really “in” right now. But if you are like me and like the look but are low on funds I have a low budget solution…a ruffled headband.

To make this headband you can use any lightweight material. I used an old chiffon skirt.

Tools & Materials
• Approximately a quarter yard of lightweight material (chiffon, organza, cotton, etc.)
• Scissors
• Sewing needle and thread in appropriate color
• Wide headband (needs to be wide enough to glue ruffle to the headband, about 1/2" at least)
• Hot glue gun
• Straight pins
• Ruler
• Piece of paper
• Pencil/pen
• Buttons (optional)

Instructions
1. Take paper and make a circle with a 2.5” diameter, cut out this circle to use as a pattern.


2. Cut out 30 circles using the fabric of your choice (fig. A).
3. Thread needle with about a foot of thread, tie a knot at the end.


4. Take a circle and fold it in half (fig. B), then in half again and sew threw the point of the folded circle (fig. C).


5. Take the remaining circles and repeat step four until all the circles are used.
Gather all the pieces together creating a ruffle (fig. D), tie off the open end and trim excess string (fig. E).


6. Hot glue the ruffle piece to the headband. I prefer mine off centered, so I started with one edge at the center top and glued the remaining down the sides but you can put the ruffle anywhere on the headband depending on taste (fig. F).


7. Adorn headband with buttons, this step is optional (fig. G).

Written by Kolleen Kilduff from Design by Night