Showing posts with label tutorial. Show all posts

Wednesday, April 10, 2013

Mom & Me Fairy Skirt Class this Sunday!


Join BEST member Kolleen from Design by Night and the ladies of Baltimore Threadquarters for a spring time Mom & Me no sew Fairy Skirt and Crown making workshop for ages 6-9. Fairy princess Kolleen will be sprinkling fairy dust and waiving her magic glue gun to help transform your little girl into a crafty fairy princess!

Create a custom made colorful whispy skirt using grosgrain ribbon and fluffy tulle. We'll make a matching fairy crown to top it off!


Where: Baltimore Threadquarters
443-759-9627

When: Sunday, April 14, 2013

Time: 1:00 PM to 2:30 PM

To sign up for the class, click here.

Saturday, March 9, 2013

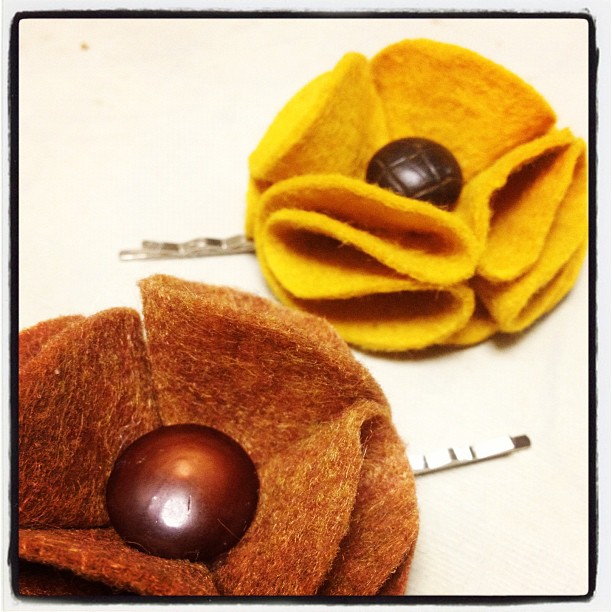
Felt Pinwheel Tutorial

View tutorial

These cute felt bobby pins are cute to wear and easier to make. BEST member Kolleen from Design by Night came this simple Pinwheel bobby pin tutorial. And if you don't want to use these pinwheels for hair pins but I could see them being used in a number of ways…cupcake toppers, party favors, jewelry, etc.

To view the step by step tutorial with photos click here or go to designbynight.blogspot.com!

Written by: Kolleen Kilduff from Design by Night

Monday, December 17, 2012

Thrifty & Crafty Holiday Decorating

I love holiday arts and crafts! Handmade snow globes are a fun and easy project, especially with kids. Baby food and pickle jars worked well as the globes. You simply adhere plastic figurines to the jar lids with superglue. Cake toppers make excellent figurines. Once the glue dries, fill the jars with water, a few strong shakes of craft glitter and a few drops of glycerin to slow the glitter fall. Then add a small amount of glue to the lid before securing it.

Inline image 1 

Acorn garland is another fun project. You need collected acorns, a small paintbrush glitter, crafting glue, tiny eye hooks and twine. Simply add a dab of glue at the end of each eye hook and then carefully screw one into the top of each acorn. Paint the acorn tops with glue and then coat them in glitter. Once all the glue dries, string the twine through each hook and then tie a knot to keep the acorns from sliding. You could also skip the eye hooks altogether and just fill a glass canister with a handful of glittered acorns.

Inline image 2

Both of these crafts adorn my mantel, along with other knickknacks that I've gathered: an antique vase filled with cinnamon sticks, an over-sized pine cone, candles, crocheted snowflakes, an old spool wrapped with red twine, old wood ornaments and other fun finds.

Inline image 3

Written by Charms City Company

Saturday, December 15, 2012

Chiffon & Tulle No Sew Flower


And the obsession with flowers continues. I don't understand I was such a tom boy as a child and now all I think about are flouncy, flirty, girly, fabric flowers. I blame it on the time a brick was dropped on my head and my mom thought it was hysterical...from tom boy to tutus!

Anyway here is another no sew flower. However, this one is a bit trickier because of the light weight of the fabric and the hot glue. So BE CAREFUL not to burn yourself, it if very easy. No one wants hot glue gun burned fingers!

Supplies:
Hot glue gun
Butter Knife (I used a plastic one so I didn't ruin a good one)
Small piece of felt
Chiffon (about an eighth to a quarter of a yard)
Tulle (about an eight of a yard)
Medium to large sized decorative shank button


  1. Print out the pattern below. (Use the scale to make sure the print out is the correct size). Out of the felt cut one 2.5"circle. Using the square, cut 30 pieces of chiffon and 10 pieces of tulle.
  2. Take a square of the chiffon and fold it in half but make sure it is off center (A). Then take that half and fold it in half again (B). 

  3. Place a dab of hot glue near the edge of the circle and place the corner of the folder petal on the glue. Using the butter knife, push down the fabric and hold it in place til it dries. Note: the knife might stick a little but the smooth surface should be easily removed from the glue leaving the petal attached to the felt backer.
  4. Repeat steps 2 and 3 using the chiffon to fill all around the edge of the backer. Don't be afraid to pack them in, you can always cut more fabric! After the edge is covered, repeat steps 2 and 3 using the rest of the fabric going around in circles until the felt backer is covered. To make my flower I used one circle layer of tulle right after the first outer circle. Then I continued with the chiffon to finish it up.


  5. Put hot glue on the back of the shank button and glue it to the center of the flower. Hold in place til the glue cools/dries.
 

Note: I did not make this flower into an accessory, however it would be great on a headband, as a hair clip or a pin. For ideas on different things to do with the flower refer to some of my other tutorials (headband, brooch, hair clips.

Written by Kolleen Kilduff from Design by Night

Saturday, October 27, 2012

Three Felt Hair Accessory Tutorials for Fall

Felt Pinwheel Hair Pins
I think felt is the best fabric to craft with in the fall. It comes in great colors, is easy to work with and doesn't fray! It's versatility can be used for a range of projects. So get out your felt and start crafting these three easy and cute fall felt accessories by Kolleen from Design by Night.

Felt Pinwheel Hair Pins are sure to be a hit for something with a bit of whimsy. 

No Sew flower pins


These No Sew Flowers can added to a variety of other projects for a little fall flair.

Felt flower headband


No Sew Flower Headband super quick and super easy...get out those glue guns!

Written by: Kolleen from Design by Night

Saturday, September 29, 2012

Essential Oils for Allergy Relief

Fall allergies can be tough; itchy eyes, sneezing, headaches - yuck! Sometimes prescription, or over-the-counter medicines, are necessary, but here are some natural solutions that have helped me.

 There are several essential oils that can be used to treat allergy symptoms by helping with respiratory distress and easing breathing.

  • Eucalyptus 
  • Peppermint 
  • Blue Tansy* 
  • Clove Bud 

Here's how to use them:


  • Place 5 - 10 drops in your electric or candle diffuser 
  • Put 8 - 10 drops on a cotton balls leave one on window sills at night (away from children and pets) 
  • Drop a few drops of oil onto a light bulb that is on and the heat will disseminate the scent 
  • Add 15 drops to a carrier oil like jojoba and after 24hrs, use as a chest rub 
  • Add 4 - 8 drops to a bowl of steaming water place your face above the bowl using a towel as a tent to keep the steam in Add 6 - 8 drops into your humidifier 


These oils are for external use only. If you are pregnant, please check with your Doctor before applying essential oils to your skin.

 *Blue Tansy really is blue and can stain fabric.

 Written by Erica of Becca & Mars

Saturday, July 7, 2012

Tutorial: Fruit Balloons


This tutorial is so much fun, how can you not like it?  Easy to make, great for parties, and kid-friendly.  Brought to you by Jordan of Oh Happy Day, a wife and mother of two who is currently living abroad with her family in Paris.  I love the whimsy and simplicity of this idea, and can definitely see it adding a special touch to summer backyard bar-b-ques and birthday parties.  Check out her blog for the how-to's and the rest of the photos.


Photos courtesy Oh Happy Day.


written by Rachel of Open Eyes Press

Saturday, June 9, 2012

Key Lime Martini Recipe


This drink is like liquid key lime pie and it is wonderful!

Ingredients:
43 Liquor
Whip Cream vodka
Half-and-half
Key West lime juice
Crushed up graham crackers
Lime (optional garnish)


Mix three parts 43 liquor, three parts Whip Cream Vodka, one part half-and-half and one part Key West lime juice in a shaker with ice. Shake vigorously. Rim glass with crushed graham crackers, pour in cocktail and garnish with a lime.


Written by Kolleen Kilduff from Design by Night

Saturday, April 28, 2012

Tutorial: UpCycled Denim Catch All


I saw these and instantly thought it would be a great way to recycle those old denim jeans that we all have. This tutorial shows regular denim color, but imagine how cute these could be with white or a colored denim with contrasting fabric. These would be terrific for the kids room to hold small toys, or better yet, how about for the bathroom for hair brushes or shampoos. When they get icky you can simply throw them in the washing machine for a quick clean up.
This was originally posted on the Craftzine blogspot.


Written by Stacey Phinney

Friday, April 20, 2012

Match Book Note Pad Tutorial


Here is another craft idea using paint swatch samples...a match book note pad. I love little note pads that are small enough to fit in your pocket. I use them all the time for shopping lists because if I do not have a list god only knows what will end up in my shopping bag with my gold fish memory.

What you will need:
  • Paint swatches
  • Paper
  • X-acto™ Knife or Scissors
  • Ruler
  • Stapler
  • Pencil
  • Bone folder or butter knife
  1. Using a bone folder or the wrong side of a butter knife, score along the bottom edge of the top color block on the swatch. Fold the edge.


    ** Scoring a piece adds a notch to the paper that makes it easier to fold. Place the ruler on the fold line and take the bone folder and run it along the length of the fold. If you do not have a bone folder you can use the back side (the un-serrated edge) of a butter knife. Do not press too hard, you do not want to rip or tear the paper.

  2. Using fig. 2 for reference, measure from the fold line to the bottom of the swatch (A). Divide that measurement in half then add .75" inches to that measurement. Using that number (Measurement B), measure from the fold and lightly mark the swatch.
  3. Score the new marked area and fold. If done correctly, the to flat should fall short of reaching all the way to the bottom to allow for the staple.
  4. Next we are going to measure the folded swatch from the vertical position so we can figure out how big the inside paper should be for the pad. Measure the width and subtract .125" (1/8"). Now measure the height, you will subtract between .125" and .25" depending on how thick you want your book. The more pages you add the shorter the height will need to be.

    Note: I made several books ranging from 12 pages to 20 pages. For the 12 page book I only subtracted .125" from the height, however the 20 page note pad required the inside pages to be .25" shorter. You will have to be the judge for what will work best.

  5. Cut a bunch of papers using the measurements from step 4. Double check that they fit in the folded swatch.

  6. When the paper notes pages are in place staple the papers and the small flap together just below the edge of the top flap.


Written by: Kolleen Kilduff from Design by Night

Saturday, April 14, 2012

Tutorial: Mondo Pom Pillow

Photo courtesy Living with Punks.


You remember pom poms, don't you? That uber trendy sewing notion of the 60's and 70's that seemed to find it's way onto every drape, poncho, and lampshade in existence? Well, like all good things retro, they're making a comeback. This Mondo Pom Pillow tutorial from Susan at Living with Punks is proof that you can incorporate this fun design element into your home and still have it be totally modern and fresh. She also has some other tutorials using ready-made pom trim, including this sweet confection pillow and floor cushion, so be sure to check those out, too!

Written by Rachael of Open Eyes Press.

Saturday, March 31, 2012

Book Purse Tutorial


If you are a book worm, this is a tutorial for you. This artful tutorial by Hungry Panda will be sure to bring out the inner librarian in you! For step by step instructions with photography on how to make a book purse visit Hungry Panda's site by clicking here.

Saturday, March 24, 2012

Wine Bottle Candle Holder Tutorial


If you are like me and like a glass of wine now and again, you might find your recycling bin a bit weighed down by wine bottles. Don't bother to drag those bottles to the curb, take them out of that bin and make some elegant Wine Bottle Candle Holders.

This great tutorial was developed by Design Sponge and a full list of supplies and instructions can be found by clicking here. These candle holders are chic and clever conversation starters plus they are good for the environment!

Saturday, March 17, 2012

Sparkly Shamrock Pin Tutorial


Add a little sparkle to your St. Patrick's day with this glitzy shamrock pin by A Fanciful Twist. Living up to the blogs name, Vanessa has put a fanciful twist on the traditional shamrock pin by making the shamrocks from non traditional colors and adding lots of bling. Who needs a pot of gold when you can have a glittery shamrock?

To find out how to make this sparkly shamrock pin, pop over to A Fanciful Twist Blog by clicking here.

Saturday, March 10, 2012

Felt Shamrock Pin Tutorial


Tis the season for the wearin' o' the green. So get your Irish on by crafting this Shamrock pin by Stitcher Scribbler. Stitcher Scribbler has easy step by step instructions accompanied by photography to help you along. This would be a great tutorial to do with children learning to sew!

To craft up a little luck 'o the Irish, visit Stitcher Scribbler's blog by clicking here.

Saturday, March 3, 2012

Easy (really!) cheese recipe


I've always thought of cheese as one of those basics that one just doesn't make at home. It's got to be too complicated, need too much specialized equipment, too difficult to get right and I am not, let's face it, a Julia Child or Marcella Hazan. Why did I even decide to try?

I've been going to the farmers markets in Waverly and under the JFX overpass for the last year and become totally addicted to the great, fresh food I find there. There is very delicious cheese but no feta and, more importantly to me, no gibna talega. Gibna (cheese) talega (refrigerator) is a wonderful white cheese that I am obsessed with finding here it the States. It's softer and less tangy than feta but different than goat cheese. I could have lived on it when I resided in Egypt. I haven't even found it at Middle Eastern groceries. I decided to see if I could make it.

The following is a combination of a recipe by Tom Beni and an instructional video by Chef John from food wishes.com.

Pour 1/2 gallon of milk into a thick-bottomed pot (not really sure if my pot has a thick bottom). Slowly heat to 165 degrees. (I did have to buy a thermometer.)Stir sometimes.Turn off heat. Pour in the juice of 4 small lemons (not quite half a cup)


Let sit for 15 minutes. The milk will start to look strange, kind of lumpy. Put two layers of cheese cloth (I didn't have any of that either) in a strainer or colander over another pot or large bowl. Pour milk into strainer.


Leave it alone for 10 minutes. Dump the watery stuff if it gets too high and cheese won't drain.

Gather the cheese cloth together. Tie something (shoelace?) around it and suspend it so it will continue to drain. I hung it from a cabinet door. You're supposed to tie it to a long spoon and set the spoon across the top of a stock pot. I'm using my stock pot for steaming my scarves.

Leave it for another 50 minutes.


Turn out of the cheese cloth onto a plate or bowl. Mix with some salt (try a quarter teaspoon). You don't have to, but it makes a nice shape if you then press it into a little container. Apparently the flavor is enhanced if you leave it in the fridge overnight. I've not been able to do that yet. Whenever you decide to eat the cheese, turn it onto a plate.

Shake pepper and oregano (if desired) over the cheese. Slather with extra virgin olive oil. Eat with pita or spread (it's too soft to slice) onto bread or melba toasts.

A few observations: This cheese has a slight lemon taste, which I think is nice with the olive oil and spices. I've heard you can make cheese using the whey (that's the watery stuff you threw away). I'm hoping that makes a non-lemon tinged cheese as my son doesn't like lemon. Also, while I think this is an amazingly delicious and EASY (I really can't stress that enough) cheese, it is not gibna talega. My search, my quest, for that particular cheese will continue.

By Susan Brandt

Saturday, February 18, 2012

A Valentine's Day Scarf

Here is how to make a simple scarf for Valentine's Day. First, stretch the blank silk scarf onto a frame.
Mix the colors. I am using light and dark pinks and reds for this one. In order to see how the colors will look on the silk, I paint little swatches on a square of silk stretched over a cardboard box.
To get soft, blended colors spray the blank scarf all over with water. You must finish all of the painted before the water dries. Start with the lightest color and paint splotches of different sizes throughout the scarf.
Do this with successively darker colors until the entire scarf is covered.
After the scarf is dry place it between layers of unprinted newsprint paper. You can add other finished scarves. Roll into a bundle and suspend it in the steamer. I made my steamer from my stock pot and some kind of pipe I found a Home Depot that just happened to fit perfectly. Steam for four hours.
After steaming hand wash the scarf using detergent and rinse until the water runs totally clear. Iron while still damp and your scarf is ready to wear or wrap as a special gift. Enjoy!
By Susan Brandt

Tuesday, February 7, 2012

I Pity the Fool Who Doesn't View this Post!


Listen sucker, Valentine's Day is less than a week away! So download this card by Kolleen from Design by Night and give it to your loved one—it will definitely put you on the A-Team with your honey.

Click here to download a pdf of this card.

The card should be printed at 100% on letter sized (8.5 x 11) paper. Trim the card using the crop marks and fold in half. The final size is 4.25" x 5.5". The sample was printed on red card stock to give it a little more XOXO. The cards will fit in a standard A2 (4-3/8" x 5-3/4"), however if you do not have an envelope handy you can refer to this tuturial for Recycled Paper Envelopes to create one.

Written by: Kolleen from Design by Night

Saturday, February 4, 2012

Valentine's Day Pie Pops

Make someone's Valentine's Day really special with this Pie Pop Tutorial! This tutorial for delicious bite size pie would be great to do on your own or with the kids. Check out Our Best Bites for step-by-step directions and presentation ideas.
Written by Dana of whoop

Saturday, January 21, 2012

Tutorial: Brown Bag Envelopes

I love the utilitarian look, and tactile feel, of kraft paper. Not to mention the fact that it's a 100% natural, biodegradable product, which can be fully absorbed back into the earth with no adverse impact on nature or human health (source)- very important! Here is a super awesome tutorial on how to make your own upcycled mailing envelopes using a brown kraft grocery bag. What a great way to create packaging that really stands out to your customers, while also being earth friendly. You could even omit the upcycled plastic bag lining entirely, use 100% cotton thread, and you have a completely biodegradable mailing envelope that can be directly tossed into the compost bin! It doesn't get any better than that. : )


Written by Rachael of Open Eyes Press

Photos courtesy The Gunny Sack